Auto ISO and when to use it.
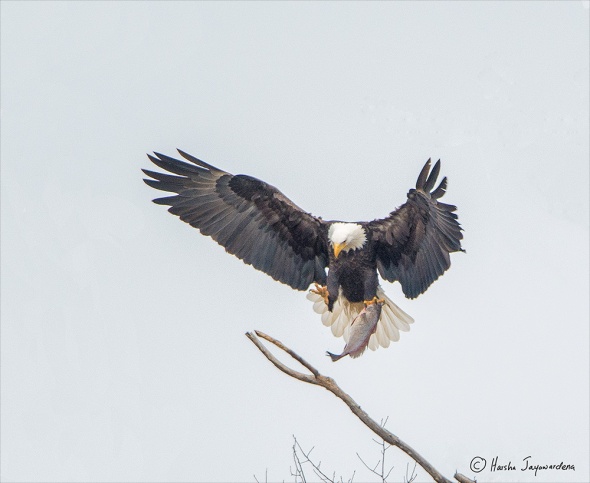
F5.6, 1/1000, ISO 1600, 850mm
Auto ISO is a useful but not well understood feature available in newer DSLRs and point and shoot cameras. When this is enabled, cameras automatically change the iso frame by frame to achieve the best image quality (at least in theory).
ISO is the measure of sensor sensitivity to the light. At the base ISO, the sensor produces its best image. After that the light signal is boosted to obtain increase sensitivity which produces noise.
Auto ISO was first implemented in Nikon DSLRs starting in 2004( D70). It was less useful at that time due to limited ISO range in earlier sensors. Newer DSLRs have better and effient sensors that can handle a wide range of ISOs. For instance my Nikon D800 has an ISO range of 100-6400. New Canon 1Dx goes from 100-51200.
I found that the auto iso can be very beneficial in situations where the lighting conditions change rapidly (i.e. if you’re photographing a theater production that has different lighting for different scenes). You want to keep the shutter speed reasonably high to get sharp pictures but want a lower ISO setting when the scene is bright. With auto ISO you can tell the camera to shoot say between ISO 100-3200 and keep the shutter speed around 1/400 second. If there is enough light the camera will drop the iso to the lowest possible number, maintaining a shutter speed of 400. When the light is low it will increase the ISO to achieve the correct exposure at 1/400 of second.
Another instance where I would use this is when photographing birds in flight on partially cloudy days . I encountered this recently when I was visiting lock and dam 14, Mississippi River on 1/7/13. The day was mostly cloudy with sun breaking through from time to time. The light was changing constantly. I set the minimum shutter speed at 1/1600 of second and set the camera to aperture priority. Iso range was set between 200-1000. During the entire session I had a minimum shutter speed of 1/1600 and many sharp pictures.
General rule of thumb is to set the minimum shutter speed at 1/ focal length of the lens you’re using. For instance if you’re using a 200mm lens set the minimum shutter speed at 1/200 second.
Consider auto iso feature a safety net. Use it in conditions where you don’t have time to fiddle with the settings.
For best results use a conservative iso range.
Using auto ISO in manual mode gives the most control. More about this later.
F5.6, 1/1000, 850mm, iso1600
So How does it work?
Different camera brands implement this feature in a slightly different way. Most of my experience is from using Nikon cameras but can be applied to any camera brand.
First thing you need to know is the useful ISO range for your camera. You cannot go by the manufacturer’s specs. The useful ISO range is much more limited than what is specified by the manufacturer. For instance my Nikon D800 has a ISO range of 100-6400. Most of the time I am only comfortable using between 100-1600 ISO range . Your limits might vary depending on the subject and your tolerance of the image noise.
Next thing you have to decide is what exposure mode to use. Most cameras allow you to shoot in three basic modes. These are manual mode, aperture priority or shutter priority. Some camera brands call these modes by different names, ( Canon call there’s Manual, AV mode and TV mode). I prefer to use aperture priority mode.
In aperture priority mode you select the aperture you want and the minimum shutter speed. The iso changes when the correct exposure cannot be maintained by the given aperture.
In manual setting (M mode) the iso changes if the shutter speed and the aperture you selected won’t achieve the desired exposure. Auto ISO in manual mode can be a powerful tool enabling control over both the shutter speed and the aperture, letting the camera control the iso.
In shutter priority( TV mode) you set the minimum shutter speed and the camera changes the aperture and the iso to maintain that shutter speed.
How do you set your camera to use Auto ISO?
Here is how I do it in my Nikon camera. Go to the shooting menu and choose ISO sensitivity settings.
Turn on the Auto ISO . In the sub menu you have the option to set the maximum iso you can tolerate and the minimum shutter speed you want.
In my D800, instead of setting the minimum shutter speed I have the option of choosing auto. If this is selected the camera sets the shutter speed at 1/focal length of the lens.
F5.6, 1/1000, iso 1000, 400mm
When not to use auto ISO
You are at the mercy of the camera when using this feature so be aware of the following
1. If your camera is old and has a limited useful ISO range.
2. If the lighting conditions are stable, it is better to use either manual or one of the other modes where you have more control.
3. If the target area covers only a small portion of the overall scene, there is a possibility that the the metering system may get the exposure wrong. In such cases all the images you capture may have the wrong exposure so it is wise to make sure the histogram is correct from time to time..
4. Be very cautious using auto ISO with spot metering. Matrix metering or center weighted metering modes are preferred .
5. Landscape photography.
6. In creative photography such as in a studio where you might want a certain look. eg. a silhouette.
7. Be conservative when setting the iso range . Otherwise you may end up with noisy images.
8. Does not work with flash. If flash is used shutter speed revert back to cameras flash sync speed. eg, 1/250 sec.
9. If you want a consistent look to your series of pictures so you can batch process them later, do not use auto ISO.
I love to hear your thoughts if you are using this feature.


A very interesting and informative article. It’s cleared up a lot of the misconceptions I had about auto ISO. Thanks for that.
February 9, 2014 at 12:09 pm
I have a Canon 5D Mark 3, I like using Auto ISO for Eagle fishing photos ..the problem is that I would like to use f 8 with speed of 1250 in Manual with auto ISO and when I track an immature Bald Eagle from the water to in to the bright sky the bird is too dark and I want to use the exposure compensation mode with out changing my other setting and I can not do this in Manual…How can I compensate quickly for a back lite dark bird in the sky?
February 25, 2014 at 6:42 am
Since I am a Nikon user I had to ask my friend Larry Williams. This is what he had to say. “I believe you can only use exposure compensation in the Aperture and Shutter speed priorities with the 5D Mrk III. You can do this with the Canon 1DX. My Mrk IV does not support this either, but I wish it did. His best bet would be to use Aperture priority IMHO.”
March 1, 2014 at 3:02 pm
Very agreeable, what you say. 😉 I do a lot of sports photography, and is nearly impossible to adjust if the sun vanishes behind a cloud or vice versa in the middle of a heated sports scene. I find the auto iso mode very useful there. 🙂
March 1, 2014 at 11:10 am
would be good for street photography where people can be moving fast?
March 20, 2015 at 4:11 am
Don’t the results
Does not lock my shutter spee to focal length
May 18, 2015 at 10:56 pm