My trip to Bitsi and Ah-shi-sle-pah badlands, New Mexico

Click for larger version
http://harshaj.smugmug.com/Locations/Bisti-New-Mexico/i-R9rkGQ7/A
The first time I saw an image of Bitsi Badlands in New Mexico it immediately was added to my list of must see places. Finally I was able to make it happen.
Bitsi is an alien landscape in the St. Juan basin dotted with hoodoos and other strange-looking rock formations. It is near the four corners area. The closest major city is Farmington, NM. It is about a three hours drive from Albuquerque. Very few people visit this remote area. Most of the area is public land managed by BLM. However some of the adjacent land is private native Indian land.
Larger map of the area,

Close up map

According to my research, spring and fall are the best times to visit. Spring can be windy and the fall is the end of the rainy season. Summer can be very hot, but this is the best time to visit if you want dramatic skies. Winter can be very cold.
I flew to Albuquerque and rented a SUV packed with camping gear and enough food to last for several days. I took I-40 west and I-371 north to reach Bisti. It took me nearly 3 hrs to get there.
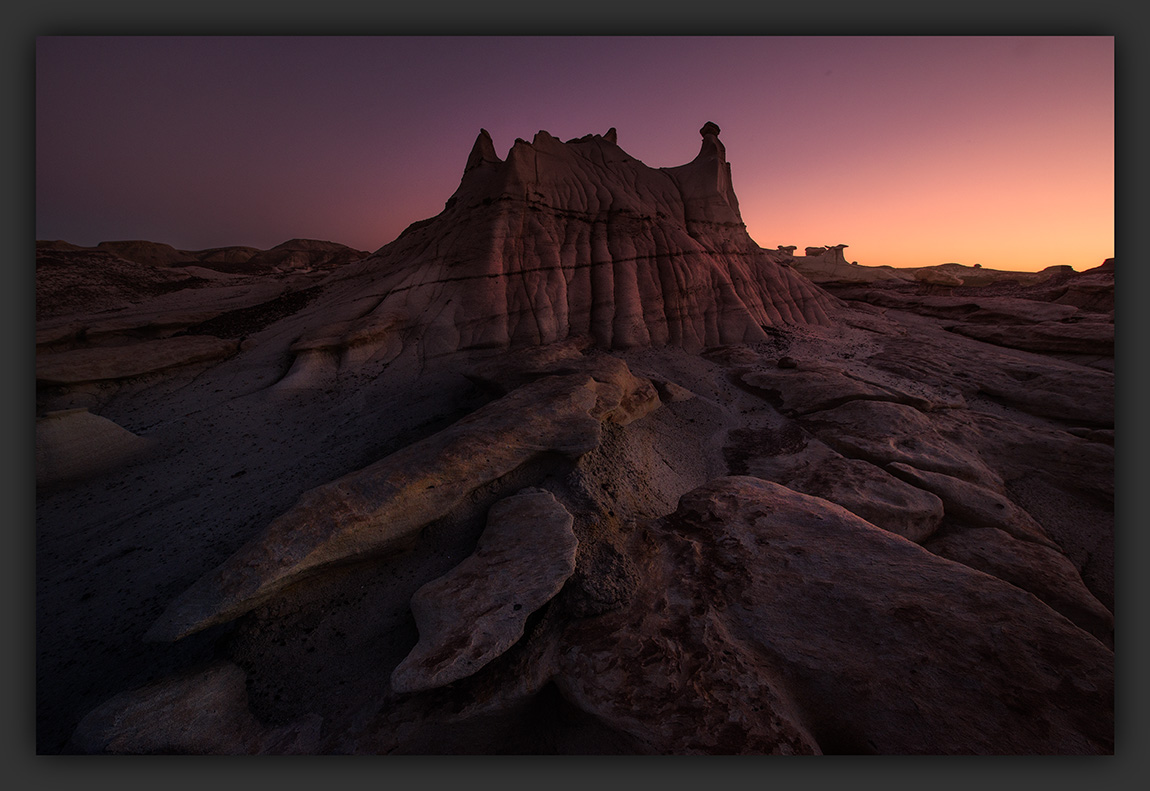
Bisti/De-Na-Zin Wilderness
The Bitsi wilderness consists of two main washers. The Hunter wash is to the north and the Alamo wash is to the south. Even though these two washes are right next to each other, there is no direct road between the two. Road 7280 between the two is impassable due to flooding. You have to go back to 371 to reach the other wash. From the parking lot the badlands expands to the east and ascends. If you ever get lost go west until you reach the road and then find the parking lot. There are no trails, signs or facilities at Bitsi. Primitive camping is allowed.
Hunter wash
Brewing Thunderstorm at the parking lot, Hunter Wash

Thunderstorms can be very dramatic in New Mexico. You don’t want to be caught in a thunderstorm in the Bisti area. You will get stuck regardless of what kind of vehicle you drive.
After a rainfall the sand turns into sticky and slick paste making the roads impassable.
Getting to Hunter wash
If you’re travelling from Farmington take I-371 south and make a left to county road 7290. At the junction there is a historical marker.

At the entrance there is a sign stating that you cannot access Bisti/ De-Na-Zin. ( This is public land and you’re not trespassing). The road ends at the wilderness parking area. Park near the fence and climb over or under the fence to get to the wilderness area. The road is not well maintained and part of it is washed off. I still think you can make it to parking lot in a passenger car, but a high clearance vehicle is recommended.
From here go east for close to a mile to find interesting hoodoo formations. The main attraction here are the wings.
 I photographed these from a mound at a lower level looking up. From here you can frame both wings. Climbing up to them gives you a different perspective (the image above). There are many interesting hoodoo formations nearby.
Larger version is here
http://harshaj.smugmug.com/Locations/Bisti-New-Mexico/i-ZHXHd57/A

Larger version is here
http://harshaj.smugmug.com/Locations/Bisti-New-Mexico/i-kpZJRQL/A
Alamo wash
This wash has two parking areas (an old parking area, as well as a new one). The old parking area is bigger, but the newer one has a sign.

From here head east. Your first landmark is two red mounds at a distance.

Head towards those red mounds. This trail is parallel to a fence line that extends for quite a distance. The fence line takes a left turn after you pass the red mounds. If you want to see cracked eggs and other formations keep to the right (southeast) of the mounds and follow the wash. Your next landmark is two black hills at a distance. Now you want to be on the left hand side of the hills.

Again head south and follow the wash. The cracked egg factory is around the corner. This can be easily missed if you don’t pay attention. After photographing the egg factory, go east. Each turn takes you to many different hoodoo formations. Keep going until you find the area called Hoodoo City.
Million year old petrified trees can be found everywhere.
 Coming back you may want to check out the hunter wash from this side. If you decide to do that follow the fence line when it starts taking the left hand turn (north). The hike here is definitely more interesting. On my way back from hunter wash I tried to use memory instead of my GPS (thought I wouldn’t recommend this). I lost my way and wasted 45 minutes trying to get back to the parking lot.

Larger version
http://harshaj.smugmug.com/Locations/Bisti-New-Mexico/i-BdtMzWL/A
The shot below was taken about an hour before the sunrise. You can see the first light on the right upper corner.
Larger Version
http://harshaj.smugmug.com/Locations/Bisti-New-Mexico/i-h9VZXMV/A
Cracked Eggs an hour before sunrise

Ah-Shi-Sle-Pah Wilderness Area
Don’t forget to visit the Ah-Shi-Sle-Pah Wilderness Area when visiting Bisti. This part of the badlands is between Chaco Canyon and Bistsi Wilderness. This area was made famous by the discovery of a specimen of a dinosaur from the late Cretaceous Period. The specimen was unearthed by Charles Sternberg and is now preserved at the Museum of Evolution in Uppsala Sweden.
Ah-Shi-Sle-Pah is known for its yellow capped hoodoos. It is conveniently divided into three main areas.
The main area ( The study area)

Larger Version
http://harshaj.smugmug.com/Locations/Bisti-New-Mexico/i-36qS3Q9/A
If you’re coming from Farmington, take 371 south to mile post 61. Take a left turn to 7650. Go 7.6 miles and make a right turn to 7870. Go 7.6 miles until you come to a T-junction. Make a left and drive 2.6 miles to the parking area for Ah-Shi-Sle-Pah on the left hand side. There is only room for one car at this parking spot, but you can park on the road.

From here to the trail head is 0.6 miles.
On my first visit, I arrived there around 2:30pm then set off around 3:30 to scout the area. As soon as I reached the main area, I went to the valley to explore. You can also get good views from the edge of the rim. Nonetheless, I wanted to photograph the yellow hoodoo which is shown here. I could see it from the valley, but there was no easy way to get up there. After trying many routes, I finally managed to reach the area. The first thing I did upon arrival here, was to make note of the best way out in case I decided to stay late. The climb is scary and not for the faint of heart (unless, of course, there is an easy way to get up that I was unable to find). A GPS unit is highly recommended to find your way around.
King of the wing

Larger Version
http://harshaj.smugmug.com/Locations/Bisti-New-Mexico/i-Hf5RLdz/A
This area is famous for the hoodoo with a long wing perched on a rock mound. To get to KOW take 7650 for 10.5 miles and turn left into a jeep trail that will take you to a windmill which you can see from the main road. You can park here or continue on the same trail for another 1/2 Mile. If you continue on the trail, then assure you have a high clearance vehicle since the road becomes rough. There is an open area on the left hand side where you can park. Once you park, head south towards the KOW. I parked beyond the windmill. To my surprise, there was another SUV already at the parking area. This area is tribal land so please do not camp here. You have to first go under the fence line heading south. After a while you come across a sea of green mounds that you have to cross. Some of the mounds are impossible to cross. The best way is to go around it. If you look to your right hand side you can see a small hill covered in wiry scrub. Head toward that and try to go around the mounds in a southerly direction. KOW is hidden from sight until you’re very close to it.
I was there at sunset with only a few clouds. I did star trails until 11pm.

Larger Version
http://harshaj.smugmug.com/Locations/Bisti-New-Mexico/i-HW8LvzP/A
While my camera was running, I lay on a flat rock and looked at the stars and the beautiful milky way. I was annoyed by all the air traffic at night because it ruined many of my frames, thus creating more work for me. One should prepare for the cooler temperatures here at night. I started heading to my car close to midnight. It took me about 48 minutes to follow the route back using my GPS device. Make sure you have two headlights if you decide to get back at night in case one fails. It happened to me and the thought of spending the night there was kind of scary.

Larger Version
http://harshaj.smugmug.com/Locations/Bisti-New-Mexico/i-NSbPS4N/A
Valley of dreams

Approach
Take CR 7650 for 7.8 miles and then turn into 7870 and drive for about 7.5 miles. Turn left to an unmarked road and head north for about 0.4 miles. bear left and go another 0.7 miles then make a sharp left. Drive for 0.4 miles and park.
Once you have parked here, mark it on your GPS and head north. It is about a mile hike but you have to cross a few dry creeks to get there. As you travel, there are many interesting hoodoo formations including an ancient roman city, mushroom formations and hoodoos looking like temples. Mark these sights on your GPS while scouting so you can come back to these when light is better.
There is another group of hoodoos called Valley of dreams east. I found these less interesting, but you might think otherwise. You can drive right up to these hoodoos so they are ideal for star trails. While the camera is running you can sleep in the safety of your car.
General tips
1. Take a GPS and extra batteries. Map will be useful if you don’t have a GPS.
2. In Bisti, walk west if you got lost. This will take you to the road.
3. Do not go there in rain. You will get stuck.
4. Scout the area in advance.
5. The best pictures are taken during the blue hour (an hour before and after both sunrise and sunset)
6. Take plenty of water and a headlight in case you decide to walk to the car in the dark.
7. No cell coverage.
If you find any of this info is inaccurate then please let me know so that I can make corrections.
Finally I have a new FB page https://www.facebook.com/pages/Harsha-Jayawardena-Photography/356029497940998 Please like the page if you want to follow my Photography.
Perfect Sunstar
How to avoid lens flare and get a perfect sun star

Click on the link for a larger version http://harshaj.smugmug.com/Locations/Canadian-Rockies/i-KxhMnMR/A
I love to include a sunburst or sun star in my images. Sun star gives that special wow to an image and draws the eye to that area. It works best when the sun is low in the horizon such as in the late afternoon, sunset and sunrise. Covering the sun partially with a cloud, mountain or a tree branch can reduce the flare.
You need a very small aperture of at least F14 to capture the radiating beams of the sun. The light rays are created by light diffraction (bending of light) at the aperture blades at these smaller F stops.
Include the sun in the upper third of the image for better composition.
Sometime sunstars can occur even at F8 under certain conditions.The image below was taken at Great fountain Geyser , Yellowstone in a late afternoon. The camera F stop was 8. I used a 14mm lens and a polarizer and was surprised to see a nice sunstar. That was created by the low angle of the sun and the sun light filtering through all of the mist from the erupting geyser.

Larger version can be found here http://harshaj.smugmug.com/Locations/Yellowstone/i-bNCgv8J/A
The shape of the sunstar is influenced by the number of blades in the lens and the shape of the aperture of a given lens. Some lenses are known to create better sunbursts.
Lens Flare
Unwanted effect of shooting directly into the sun is the lens flare.

The flare is caused by light reflections inside the lens itself. Many factors contribute to this.
1. Certain type of lenses are more prone to this. High quality lenses have many anti reflective coatings applied to the surface that reduce the flare. Nikon uses a Nano coating and fluoride coating to reduce the flare and Canon lenses have similar coatings.
2. Presence of a protective filter such as a UV filter can make the flare worse. Remove the filter to reduce that.
3. The best way to avoid the flare is to use the lens hood provided with the lens. This significantly reduces the flare by preventing stray light from entering the lens.
4. Dirt on the lens makes the flare worse and a clean lens goes a long way to avoid this.
In spite of all the precautions mentioned above, you can still get lens flare. Of course if you hide the sun behind a tree or mountain in your composition you’re not going to see the flare but then that beautiful sun star is not going to be in the image.
There are few things you can do to help the situation.
Use a piece of cardboard or your hat as an extension of your lens hood. Experiment with the angle to shade the lens while looking through the view finder. When you don’t see the flare press the shutter.
Changing the angle of the camera may also help.
Another trick that works is to take a shot with the flare and take another shot placing your finger in front of the sun to cover it. As longs as the composition hasn’t changed the two shots can be combined later. This works best for me.
Here is how this is done. The image is not a great shot and was shown here for demonstration only. Here is my first exposure shooting directly into the sun. Noticed the flare.

The next shot was taken with a finger to cover the sun. This significantly reduced the flare but you still can see it.

I combined the two in PS and did some minor correction to get the final image shown below. It still shows my sloppy work with healing brush tool but you get the idea.

Photographing the Milky Way Galaxy.
The Universe and Beyond by Terrence Dickinson is one of my favorite astronomy books. After reading the book, I was fascinated by the complexity and mystery of the universe. I started researching and found out that I can take milky way shots with the equipment I already have.
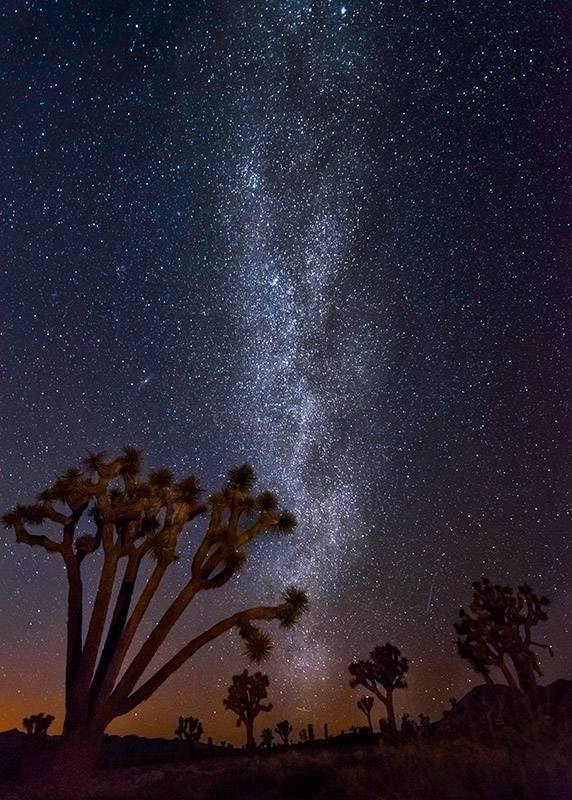
Joshua Tree forest with milky way in the background.
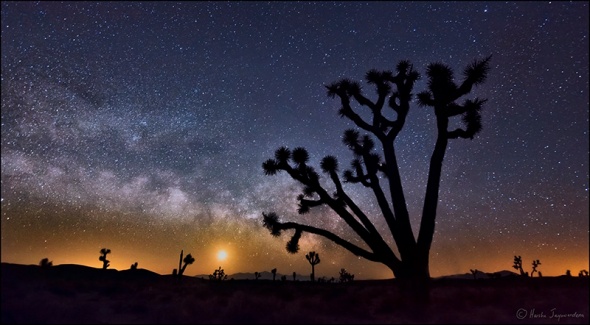 D800, 16-35/F4 at 19mm, iso 6400, 30 seconds
Here is a shot of Old Faithful under the milky way taken during my recent trip to Yellowstone.
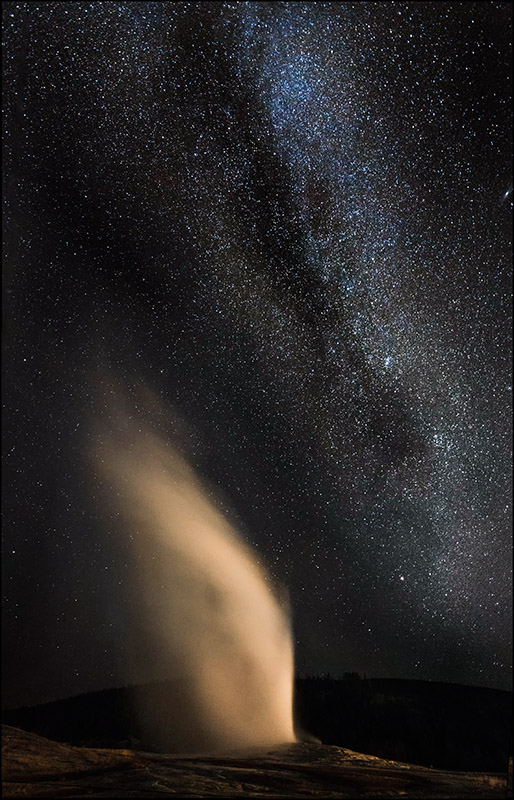
D800, 16-35/F4 at 16mm, iso 6400, 30 seconds
Milky Way is our own resident galaxy. It is 10 billion years old. The sun is located in one of the outer spiral arms, 27,000 light years from the center. From edge to edge it spreads over 90,000 light years. The bulging disk at the center is 10,000 light years thick. It is home to about 200 billion stars. The center of the galaxy is a giant black hole. Milky way is clearly visible in a moonless night.
If you’re lucky you may even see the andromeda galaxy, the only other galaxy visible to the naked eye. It is about 2.4 million light years from earth.( one light year = 6 trillion years) In the above image the andromeda galaxy is seen in the upper right part of the image at the edge of the frame. Our galaxy and the andromeda galaxy belongs to what is called the local group that contains about 50 other galaxies.
The Andromeda and the Milky Way galaxies are on a collision course and speeding at each other at 1.2 million miles an hour. NASA projects that in 4 billion years from now the two will crash head on . I hope I live to see the fireworks when that happens.
http://www.huffingtonpost.com/2012/05/31/milky-way-andromeda-galax_n_1561289.html
Death Valley National Park, D800, 16-35/F4 at 16mm, iso 6400, 30 seconds
Milky way is best seen in summer months. At this time of the year we are looking towards the center of the galaxy and away from it in the winter. However to really see the spectacle of milky way you may have to drive an hour or two away from the nearest city. Wait another 20 minutes to allow the eyes to adjust to the darkness.
A compelling image of the Milky Way can be made without fancy equipment .
1. Equipment.
You need a DSLR. Newer full frame DSLRs can handle noise well and better suited for this kind of work. Crop sensor DSLR will still work but noise can ruin the image if you raise the iso too high. Fast wide-angle lens is the next requirement. I would recommend a lens with at least 24mm wide. Wider is better. I used my 16-35/F4 lens at 16mm for the above shot. Because the stars are so faint, the lens need to gather much light as possible. F2.8 lens is perfect but F4 lens will do too. Use the self timer or a cable release to avoid camera motion. Sturdy tripod is a must. Head lamp is useful to see and adjust the camera setting in the dark.
2. Location.
Find an area that is away from light pollution and city lights. Here is a link to Dark sky finder that helps to find the darkest areas in North America. It is an overlay of a light pollution map on the google map of North America. http://www.jshine.net/astronomy/dark_sky/
The Photographer’s Ephemeris (TPE) is program that can be useful. It will tell you the times of sunset/sunrise and moonrise/set.
For brighter skies time your shots during the new moon.
Presence of foreground elements make a better shot. This could be a tree, a mountain range or something iconic like old faithful.
3. Settings.
The idea is to get much light as possible to your sensor. Try the highest ISO that your sensor can handle before noise creeps in. In the above example I used ISO 6400 on my nikon d800. You may be able to getaway with ISO 3200 in a moonless night. Use the largest or the widest aperture available on your lens. To avoid star trails the shutter speed needs to be less than 30 seconds. A good way to find out the longest shutter speed you can get away without star trails is to divide 600 by your lens diameter. For instance if you use a 24mm lens the maximum shutter speed you can use is 600/24= 25 seconds. This calculation is for full frame sensor. If you are using a crop camera make adjustments( even shorter shutter speeds). Turn on your long exposure noise reduction in your camera menu. Shoot raw.
However if you are more ambitious and planning to print big, you need a camera mount that track the earth rotation.(equatorial tracking mount). This allows you to use a lower ISO and a longer exposure for brighter and better quality images. AstroTrac TT320X-AG is a reasonably price mount that sell for about $550. Another more compact mount that sell for $399 can be found here http://www.bhphotovideo.com/c/product/915892-REG/iOptron_3300B_SkyTracker_Camera_Mount_with.html.
4. Technique..
Set the camera to manual mode. Set the aperture and shutter speed manually. I usually use the bulb mode and time the exposure using my watch or cell phone. In the above picture, the settings were as follows. F4, 30 seconds and ISO 6400. On your lens turn off the AF and set the focus ring to infinity. Use a piece of tape on the focus ring so it wont accidentally rotate. Use a remote trigger or self timer.
5. Test shots.
Take few test shots. To save time, increase your iso to say 24,00 or 51000 and expose for 10 seconds. Don’t pay attention to the quality of the image. Your are now trying to compose the shot. Pay attention to your foreground elements and the horizon.Once you are satisfied with the image go back to the recommended settings.
6. Post processing may need curve adjustments, selective sharpening and noise reduction.
7. Useful accessories
Head light, cable release, tape, watch ,tripod and ball head.
Smartphone apps night sky and star walk (http://vitotechnology.com/star-walk.html)k can help you navigate the dark sky. I use sky walk. You can point the smart phone or iPad to the sky during day time when scouting the location. The projected position of stars and the milky way at a given time is shown on the app which is very useful in planning the shot.
.
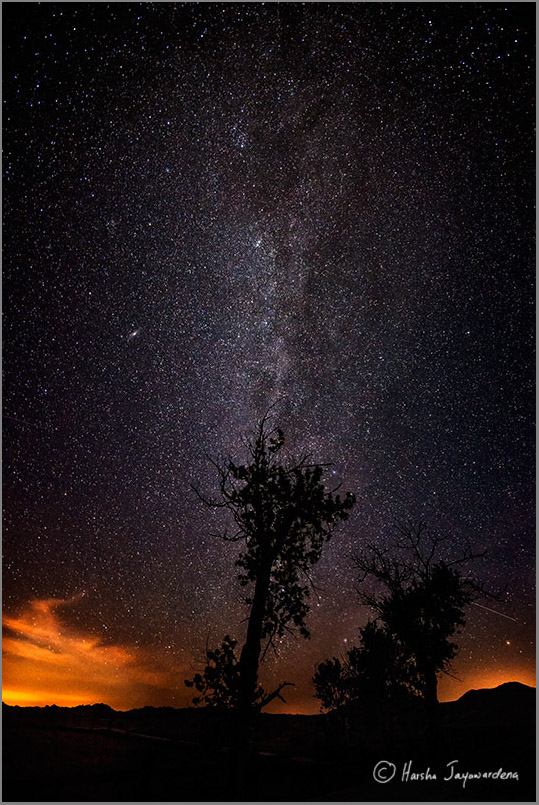
Here is another milky way image taken in Badlands National Park, South Dakota.
Clear skies.
Harsha
Quick way to get rid of the color cast
Serengeti Sunset

D3, F8, ISO 200, 1/2500, 600mm
The first thing I do in post processing an image is to open it in camera raw and make global adjustments.
Then I open the image in Photoshop and correct the color cast before doing any further processing.
Go to layer menu and select new adjustment layer > curves
In the curve dialog box, under blending modes, choose color and press OK. This will open the curve dialog window. Click auto (in the top right hand corner) and this does a good job of correcting the color cast.
Give it a try.